The dream of every beginner photographer is to create images that capture the beauty of nature: photos that tell a story. But when your local woodland is your canvas, it can be daunting to bring order to the chaos of trees, shadows, and textures. Mastering woodland photography basics is essential for transforming the overwhelming chaos of the forest into captivating, story-filled images.
By understanding simple techniques and developing a mindful approach, you can build your confidence, refine your skills, and discover the creative potential of your local woodlands.
Many photographers overlook their local woodlands, assuming they are too challenging or uninspiring, preferring to wait until they can travel to dramatic landscapes. Yet, woodlands offer an incredible opportunity for growth – right on your doorstep.
If you’ve struggled to tame the chaos of the forest and compose compelling images, this guide is for you. We’ll cover the following in this article:
Table of Contents
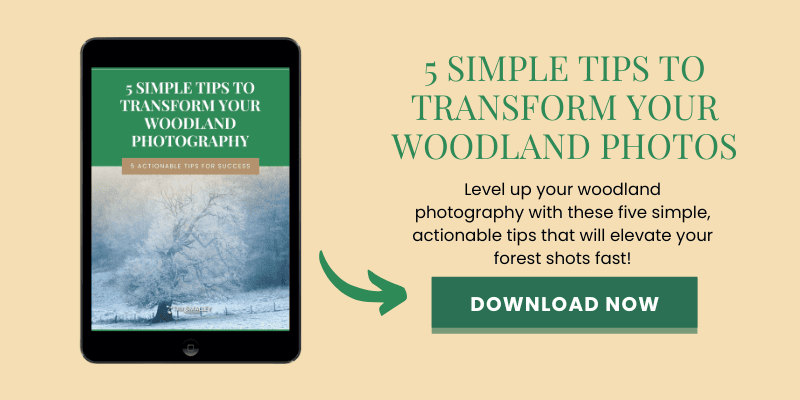
And to help you take what you learn here even further, download my free guide, 5 Simple Tips to Transform Your Woodland Photography. With these actionable tips, you’ll be capturing stunning woodland scenes in no time.
What Is Woodland Photography?
Woodland photography is the art of capturing the beauty and essence of forests. It’s about finding storytelling opportunities in the natural world—whether it’s through the grandeur of towering trees, the delicate patterns of moss on a log, or the interplay of light and shadow filtering through branches. Each forest presents a unique challenge, with its chaotic, layered environment offering both obstacles and inspiration.
At its core, woodland photography is about turning this seeming disorder into a visually compelling image. Success in this genre requires more than technical skill—it demands a keen eye for composition, an understanding of natural light, and a mindset of curiosity and observation. It’s as much about seeing and interpreting as it is about capturing.
For beginners and hobbyists, woodland photography offers an accessible gateway into the world of outdoor photography. Local woodlands, often just a short walk or drive away, provide an ideal setting to practise and hone your skills without the need for expensive trips to iconic landscapes. With the right techniques, even the simplest woodland can become a rich source of creativity and photographic potential.
Beyond the technical aspects, woodland photography is a deeply rewarding experience. It invites you to slow down, immerse yourself in nature, and develop a mindfulness that can enhance both your photography and your overall well-being. Every forest has its stories—your challenge is to discover and share them through your lens.
Why Start Woodland Photography?
Woodland photography offers something truly unique – a blend of serenity, creativity, and endless possibilities. Unlike sweeping vistas or iconic landscapes, forests encourage you to slow down and focus on subtle details. They’re not about capturing grand, dramatic views but about finding beauty in the small, often overlooked moments. For beginners, this is a fantastic way to develop your photographic eye and build patience. Woodlands force you to be present, observe light, and think critically about composition. Better yet, they’re accessible – whether you’re near a local nature reserve, a public park, or a dense forest, there’s always an opportunity to capture stunning shots nearby.
But woodland photography isn’t just about taking photographs. It’s about the experience. Imagine stepping into a quiet woodland, hearing only the rustling of leaves and the occasional birdsong. There’s something deeply therapeutic about it that goes far beyond capturing an image. It’s a chance to escape the busyness of daily life and reconnect with nature. Studies even suggest that spending time amongst trees can reduce stress and improve mental clarity. So, while you’re learning to photograph, you’re also giving yourself the gift of well-being.
One of the best things about woodland photography is its unpredictability. Unlike controlled studio environments, woodlands are constantly changing. The way light filters through the trees shifts with the time of day, the weather, and the season. A scene that looks flat and uninspiring at noon might transform into something magical during golden hour. This dynamic nature keeps things exciting – you never know what you’ll discover.
When I first started, I found woodlands overwhelming. Trees were everywhere, the light was patchy, and I had no idea where to begin. Over time, I learned to look for patterns – like the curve of branches that framed a shot or a sunbeam that lit up a patch of moss. These small discoveries helped me fall in love with the process. Woodland photography isn’t about rushing to take as many pictures as possible; it’s about enjoying the journey and letting the woodland guide you.
Whether you’re completely new to photography or looking for a fresh challenge, woodland photography offers a deeply rewarding experience. It stimulates creativity, encourages mindfulness, and, most importantly, helps you see the beauty in the everyday. Trust me – once you start, you’ll be hooked.
If you’re ready to improve your woodland photography, download 5 Simple Tips to Transform Your Woodland Photography for actionable advice to get started today.
Essential Gear for Woodland Photography
When it comes to woodland photography, having the right gear can make a world of difference. Don’t worry, you don’t need the most expensive equipment to start capturing stunning forest scenes. Let’s explore the essentials and focus on what truly matters for beginners.
First, let’s talk cameras. Whether you use a DSLR, a mirrorless camera, or even a smartphone with manual controls, the key is understanding your equipment. DSLRs and mirrorless models are particularly good for woodland photography as they let you adjust settings like aperture, shutter speed, and ISO. For beginners, cameras such as the Canon EOS R50, Nikon Z30 or Sony A6100 offer excellent features without being overly complicated. I started with a second-hand DSLR, and it served me well for years. The truth is, the best camera is the one you’ve got with you, so long as you know how to make the most of it.
Next, lenses. Woodland scenes often benefit from focal lengths in the 35mm to 85mm range. These focal lengths allow you to isolate subjects – like a sunlit tree or a patch of wildflowers – while still capturing some of the surrounding environment. My main lens for woodland photography is a 24-105mm f/4, which I use on a full-frame camera, as it gives me a good range of focal lengths, a reasonably wide maximum aperture and is relatively lightweight, too.
An equivalent lens, such as a 16-70mm or an 18-135mm, are great choices for APS-C cameras like those mentioned above. A 50mm f/1.8 “nifty fifty” prime lens is another brilliant, affordable option for beginners, providing sharp images and lovely depth of field. Avoid relying too much on wide-angle lenses. While they’re great for dramatic landscapes, they can make woodland scenes look messy and overcrowded. Instead, use them sparingly when the composition calls for it, like capturing a tree canopy.
A tripod is an absolute must for woodland photography. Lighting in forests can be unpredictable, and a tripod allows you to use slower shutter speeds for sharp, well-exposed images. I learned this the hard way – my first few attempts were filled with blurry photos because I tried to handhold the camera in low light. A tripod also gives you the freedom to experiment with different angles and compositions without rushing.
Accessories like filters can elevate your photos. A polarising filter is fantastic for reducing glare on leaves and enhancing natural colours, while neutral density (ND) filters are handy if you want to experiment with long exposures. And don’t forget the basics: extra batteries, memory cards, and a comfortable camera bag are essentials for any shoot.
Finally, let’s talk about weatherproofing. Forests are unpredictable environments, and a sudden downpour can put your gear at risk. A waterproof camera cover and a rainproof backpack can save you a lot of trouble. On one occasion, I was caught in a heavy rainstorm while photographing a woodland path, but thanks to my weatherproof kit, I was able to keep shooting without worry.
In summary, you don’t need a fortune to start woodland photography. With thoughtful choices and a focus on versatility, you can get started with gear that suits your budget. The right tools, combined with preparation and practice, will set you up for success in capturing the beauty of the woods.
Woodland Photography Composition Basics
Start by finding a focal point. A strong focal point anchors your image and gives viewers something to focus on. It might be a particularly striking tree, a sunlit patch of moss, or even a winding path. Without a focal point, your photo risks looking aimless. I often ask myself, “What caught my eye first?” Whatever it is, I build my composition around that. Once, I spent nearly an hour photographing an old oak tree with moss-covered roots. It wasn’t the most obvious subject, but isolating it turned a busy scene into a compelling image.
Leading lines are an invaluable tool in woodland photography. These are natural lines in the scene, such as trails, streams, or leaning branches, that guide the viewer’s eye through the frame. Positioning these lines carefully can create a sense of depth and draw attention to your focal point. Experiment with angles – crouching low or shooting from a higher vantage point can completely change the way leading lines interact with the rest of the image. Some of my favourite photos come from simply moving a few steps to the left or right to find the perfect alignment.
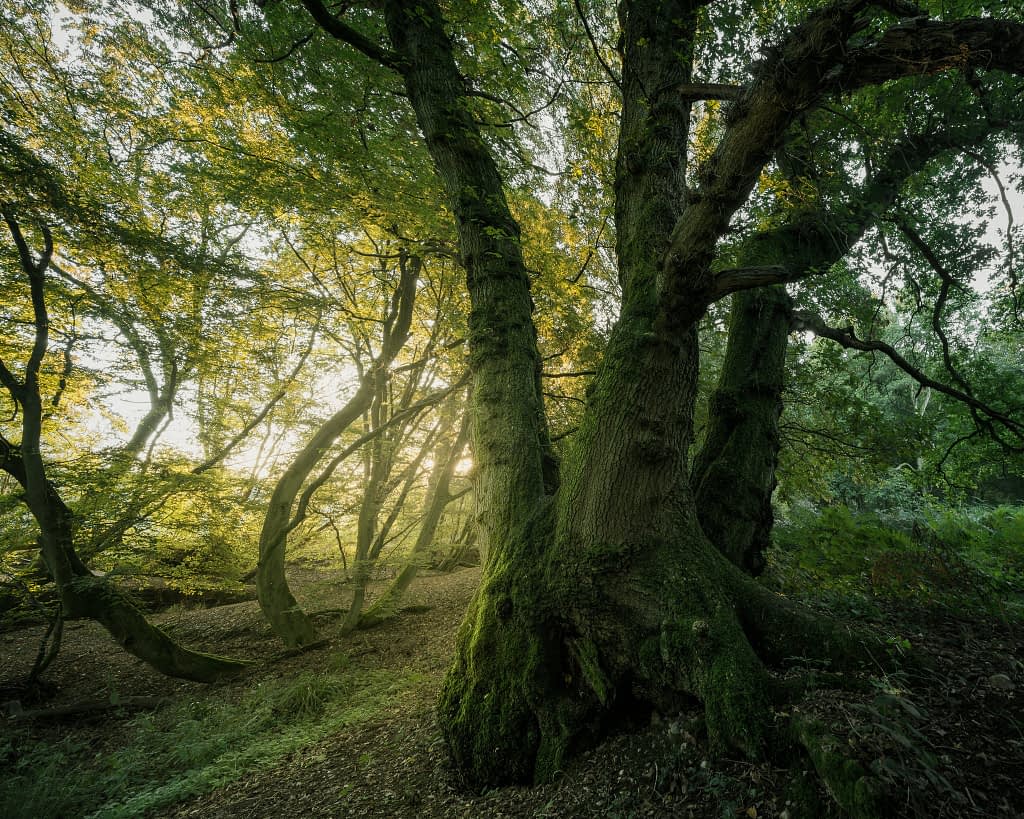
Creating separation between elements is also key. Forests are inherently dense, so it’s important to ensure that your subject doesn’t get lost in the clutter. Look for ways to isolate your focal point, whether through light, contrast, or positioning. For example, a single tree illuminated by a sunbeam can naturally stand out against a darker background. This technique, which I like to call “spotlighting,” is one of my go-to tricks for simplifying busy scenes.
Framing is another effective composition technique. Use natural elements like arching branches, tree trunks, or even a gap in the foliage to frame your subject. This not only adds structure to your photo but also directs the viewer’s eye to the main subject. On one shoot, I framed a deer between two trees – it turned an average photo into one of my all-time favourites.
Lastly, don’t be afraid to break the rules. While principles like the rule of thirds and leading lines are helpful, some of the most striking woodland photos come from experimentation. Try focusing on textures, shooting off-centre, or even playing with motion blur for a more abstract effect.
Composition takes practice, so don’t expect every shot to be perfect straight away. Spend time observing the scene, experiment with different techniques, and most importantly, enjoy the process of discovering your unique style.
Woodland Photography Composition Tips
1. Use a Tripod to Slow Down
A tripod is more than a tool for stabilising your camera – it encourages a more deliberate approach to photography. In woodlands, where lighting can be dim, and compositions are intricate, a tripod allows you to carefully frame your shot, refine your balance, and focus on eliminating distractions.
It’s particularly useful for long exposures, whether you’re capturing the gentle flow of a stream or the serenity of a misty morning. Slowing down with a tripod also gives you time to immerse yourself in the scene, leading to more thoughtful compositions.
2. Seek Diffused Light for Better Results
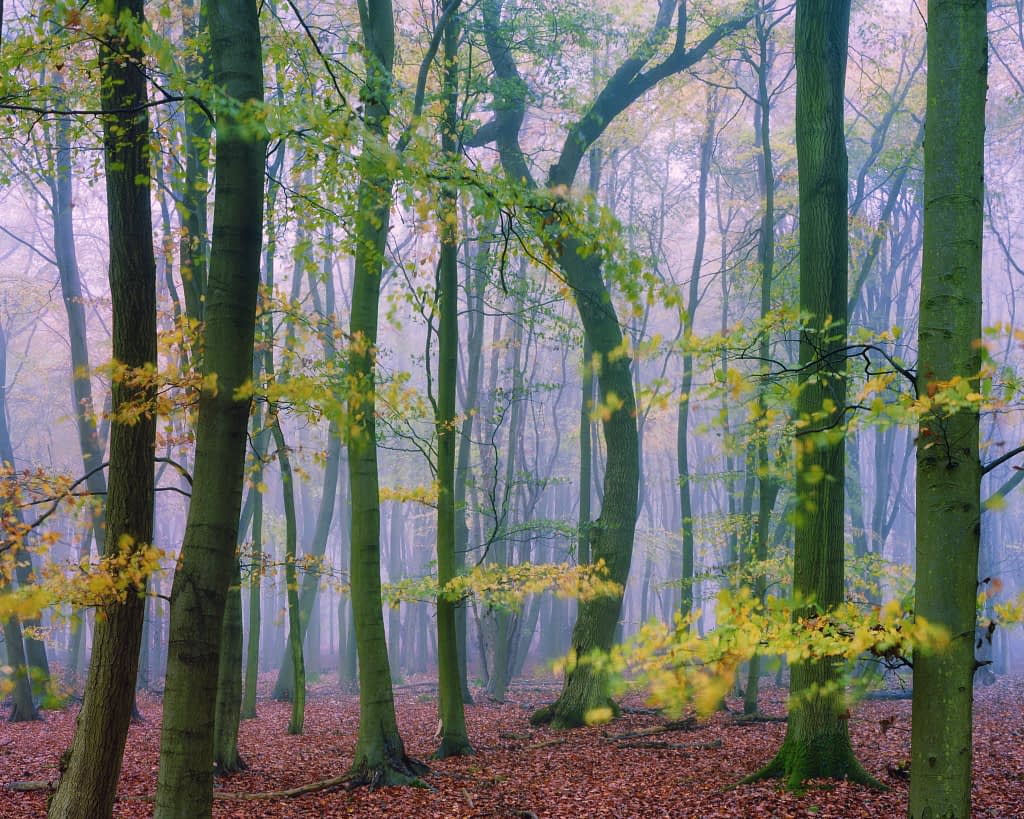
The best woodland photographs often rely on soft, diffused light. Harsh sunlight can create overpowering contrasts, while overcast conditions or mist soften shadows and bring out the textures and colours of the forest.
Look for opportunities in:
- Overcast skies: Perfect for even, shadow-free lighting.
- Rain or fog: Enhances atmosphere and depth.
- Backlit leaves: On sunny days, look for areas where light filters through foliage, creating a glowing effect.
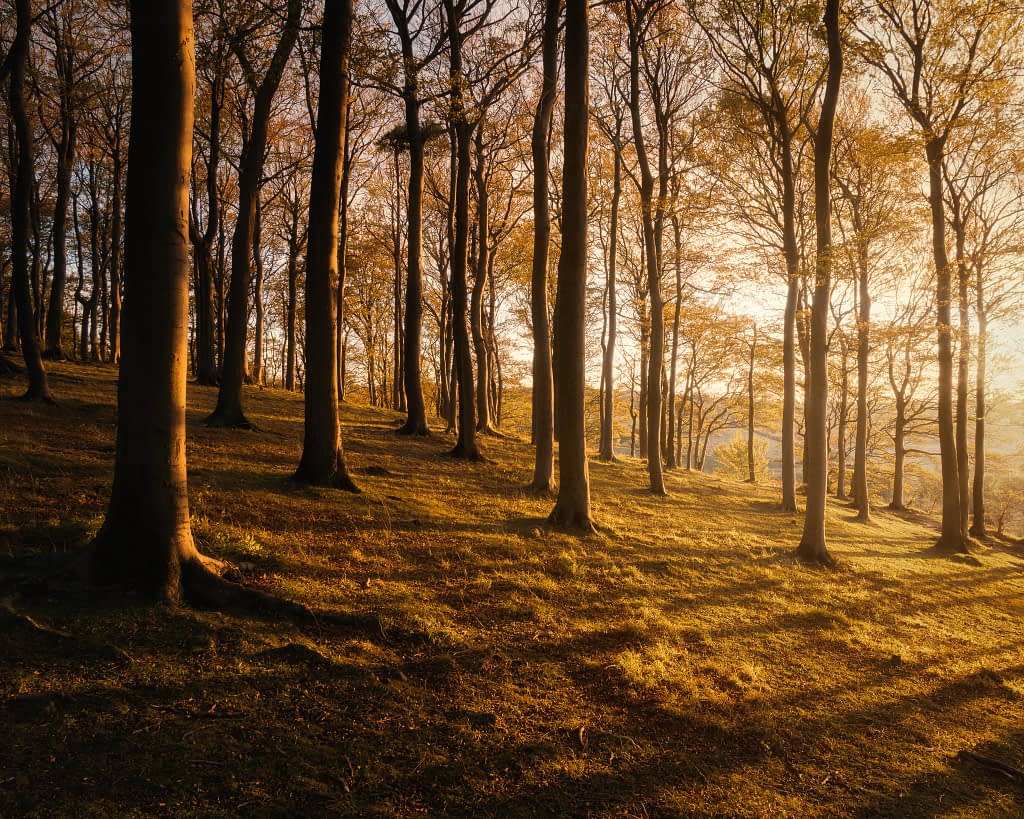
3. Find Characters in the Chaos
Woodlands can feel like a sensory overload, with countless elements competing for attention – dense foliage, tangled branches, scattered light, uneven terrain, and of course, the wildlife. To create a compelling image, simplify the scene by focusing on one or two standout elements, or “characters.” These characters could be a uniquely shaped tree, a cluster of glowing mushrooms, or intertwined branches that appear to “converse.”
By isolating these elements, you create a focal point that provides structure and purpose. Experiment with framing and perspective to highlight these characters. Use natural frames like overhanging branches or adjust your angle to eliminate distractions. Move around – sometimes the perfect composition is found a few steps to the side or by crouching lower. Every woodland has hidden gems waiting to be discovered; seek them out and tell their story.
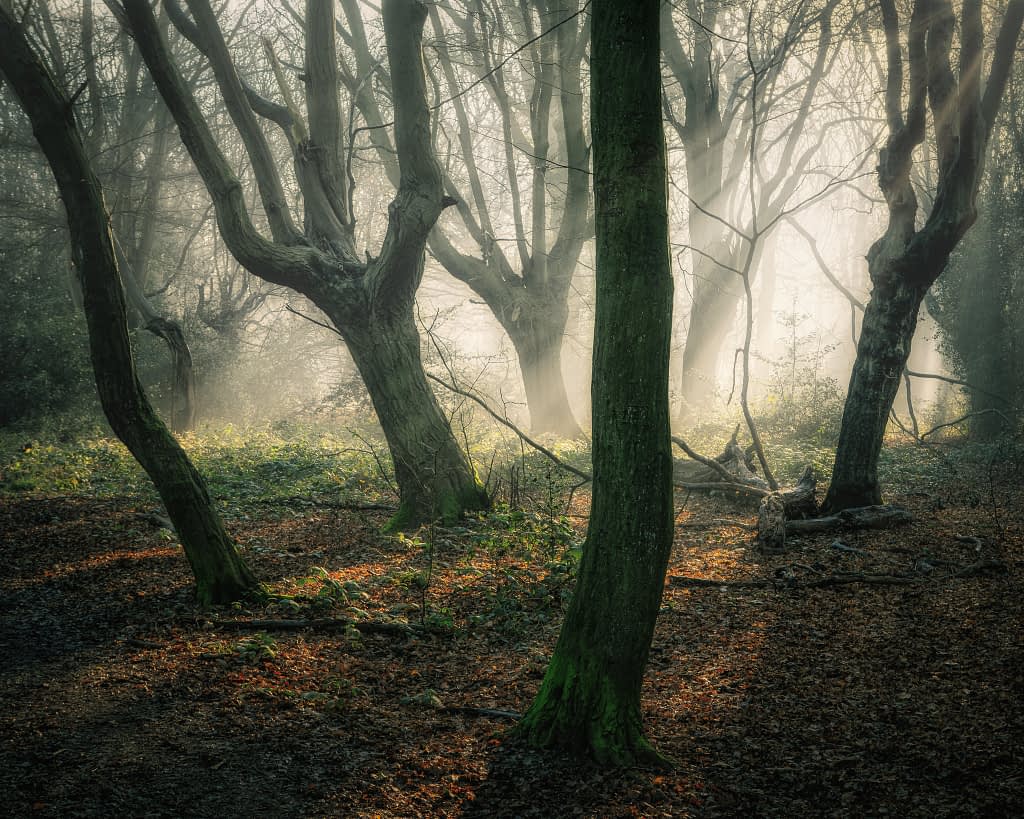
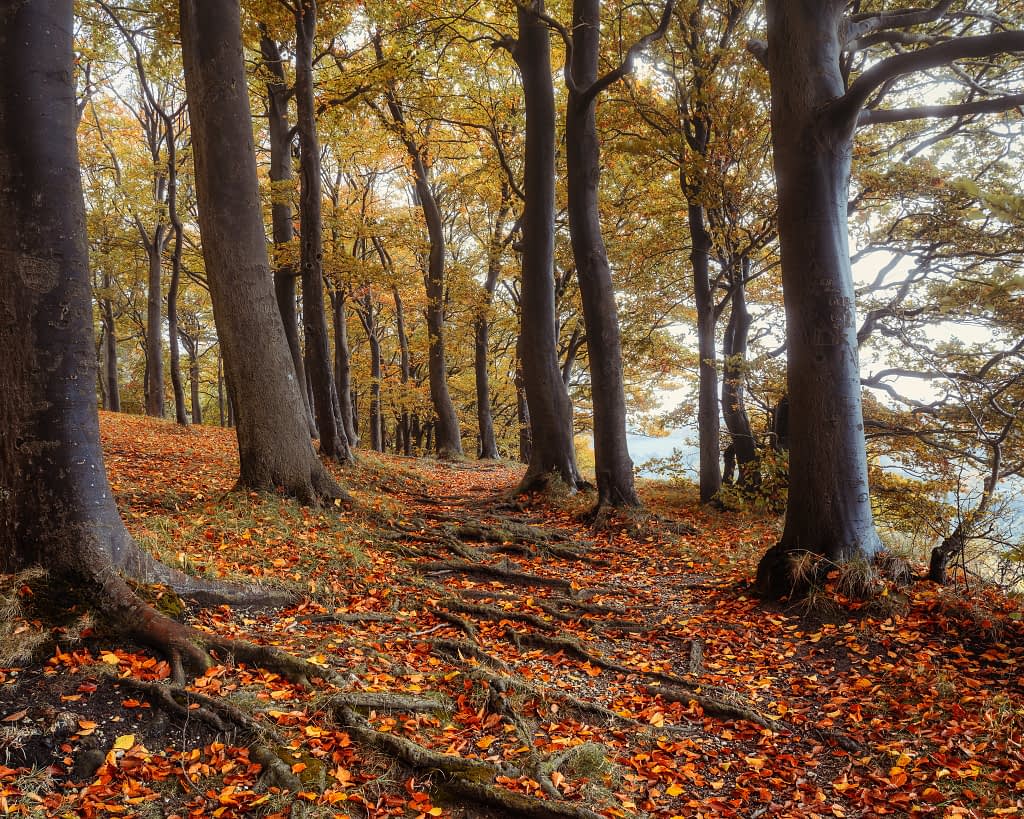
For example, in the image above, my attention was immediately drawn to the exposed roots weaving across the path, beautifully adorned with copper leaves. These roots guide the viewer’s eye naturally through the scene, eventually settling on the three groups of two trees near the centre of the frame. To achieve this composition, I carefully positioned the camera to ensure separation between the key elements and dominant trees, creating a balanced and harmonious scene.
Lighting Tips for Stunning Woodland Photos
Lighting can make or break your woodland photography. The interplay of light and shadow in forests is one of the most captivating aspects, but it can also be tricky to master. Learning how to work with different types of light is key to creating images that stand out.
Overcast weather is a woodland photographer’s best friend. The diffused light eliminates harsh shadows and creates even exposure, making it easier to capture fine details in leaves, tree bark, and the forest floor. I’ve found that cloudy days are perfect for photographing mossy textures or intricate root patterns without worrying about distracting highlights. While some beginners think overcast skies mean dull photos, in woodlands, they’re a blessing.
Misty mornings are where the magic happens. Fog creates a sense of depth and mystery, layering the scene with soft, ethereal tones. Arriving early is essential, as mist tends to burn off quickly once the sun rises. On one memorable shoot, I ventured into a forest just as the fog was lifting. The mist hung between the trees, and the shafts of light filtering through it created an atmosphere that felt almost otherworldly. Moments like these are rare, but when you catch them, they’re unforgettable.
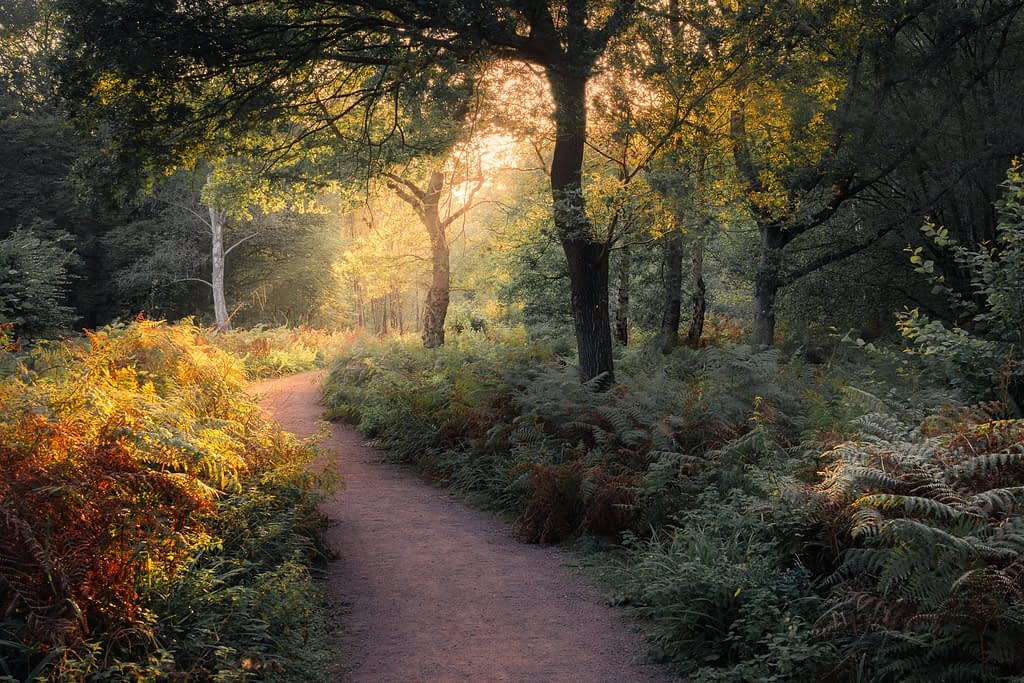
Backlighting is another fantastic technique for woodland photography. When the sun is low, position yourself so it’s behind your subject. This creates a glow effect, especially on leaves, making them look almost like stained glass. The light enhances their shapes and textures, adding depth and vibrancy to your photos. I’ve spent entire afternoons chasing backlighting through the woods, and the results are always worth the effort.
Golden hour – the hour after sunrise and the hour before sunset – is one of the best times to photograph woodlands. The low-angle light adds warmth and dimension to your images, emphasising textures and creating long, dramatic shadows. Twilight, just after sunset, can also be incredibly atmospheric, with soft blue tones giving your photos a moody, serene quality.
Rainy days, often avoided by many photographers, are a hidden gem for woodland photography. Rain saturates colours, making greens and browns more vibrant. Wet leaves reflect light beautifully, adding a glossy texture to your images. Bring a waterproof camera cover and an umbrella, and you’ll be surprised by the results. I’ve captured some of my most dramatic woodland shots during light rain, where the damp conditions enhanced the mood and colour of the scene.
In woodland photography, lighting is both a challenge and an opportunity. Learning to work with different conditions – overcast skies, mist, backlighting, and even rain – will expand your creative toolkit and help you capture the true magic of the forest.
Seasonal Photography in Woodlands
One of the joys of woodland photography is witnessing how the forest transforms with the seasons. Each time of year offers unique opportunities to capture the changing mood and beauty of the landscape. Let’s explore how to make the most of each season.
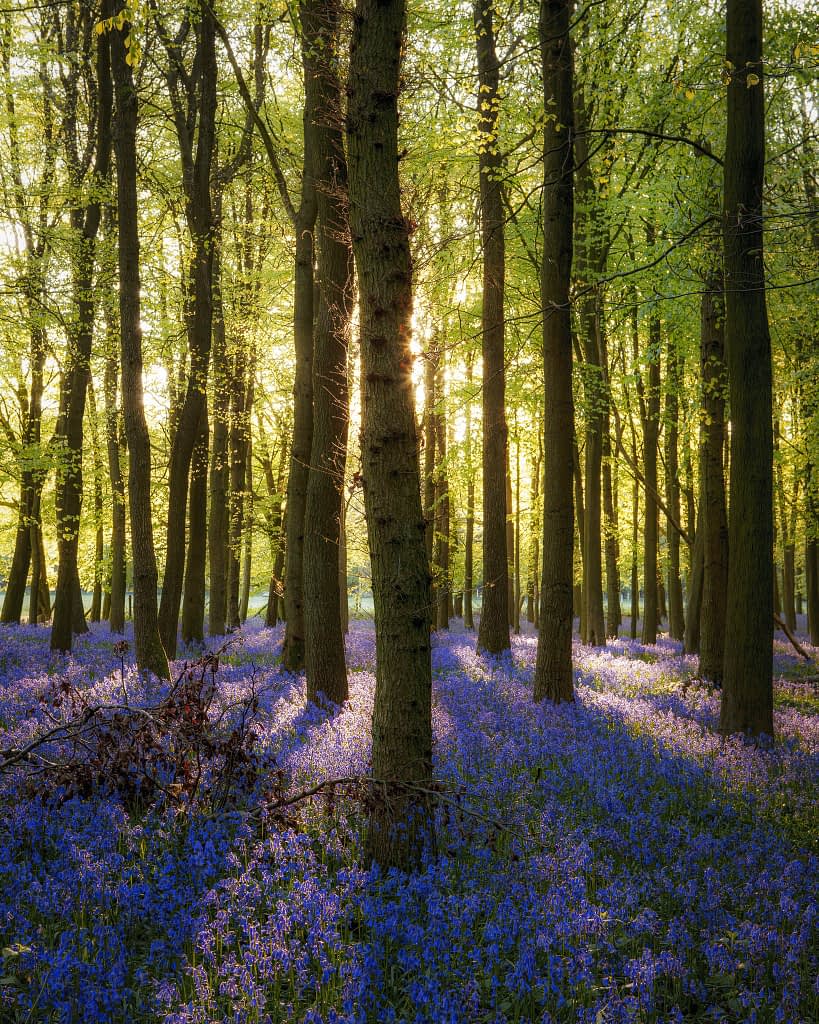
Spring is a time of renewal and growth, making it a favourite for many photographers. Fresh green leaves, blooming wildflowers, and soft morning light create a sense of energy and vibrancy. Bluebells are a highlight of spring woodlands, carpeting the forest floor with their stunning hues. Photographing them at dawn, when the light is gentle, can result in truly magical images. I remember my first bluebell shoot – it was early morning, and the light filtering through the trees created a scene that felt almost surreal.
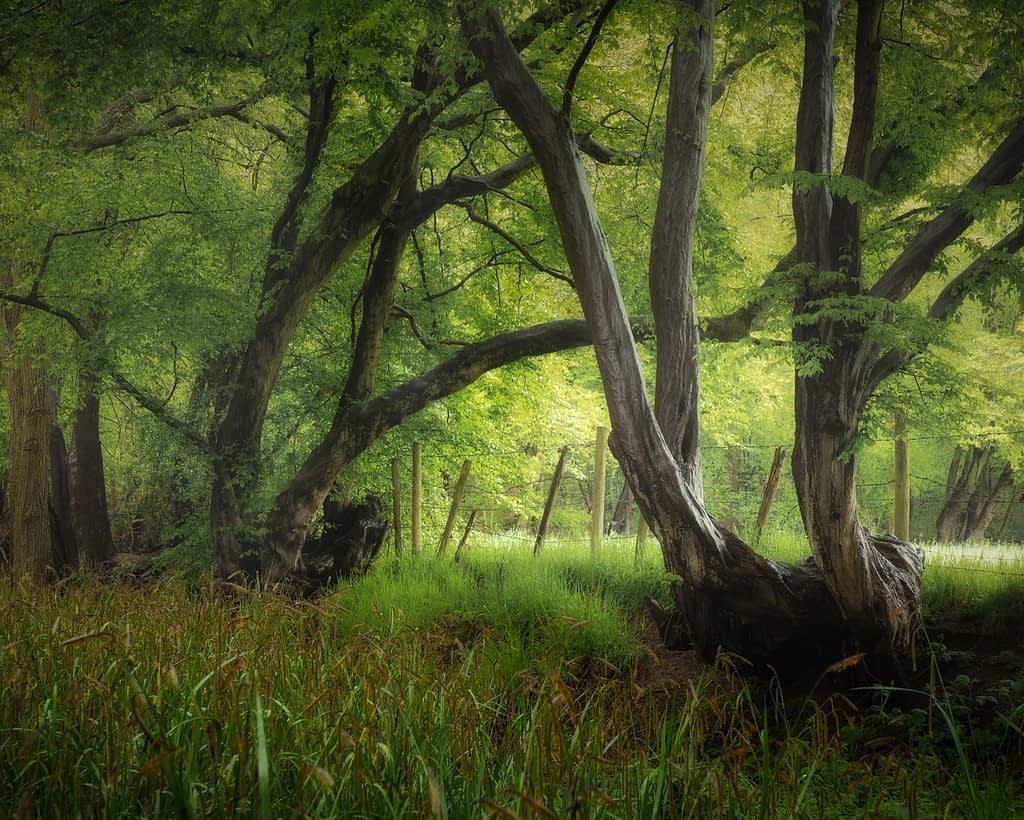
Summer poses more of a challenge, as the dense canopy often blocks light, creating darker, more contrast-heavy conditions. However, it’s also a time for creativity. Dappled sunlight filtering through the leaves can add a dynamic quality to your shots, while the deep greens of summer foliage provide a lush backdrop. Early mornings and late afternoons are the best times to avoid harsh midday light. I’ve found that focusing on details – like the textures of tree bark or the patterns of light on the forest floor – yields some of the most rewarding results.
Autumn is perhaps the most iconic season for woodland photography. The vibrant reds, oranges, and yellows of the foliage transform the forest into a photographer’s paradise. Fallen leaves create a natural carpet of colour, while misty mornings add an extra layer of atmosphere. Capturing the interplay of light and colour during this season is an absolute joy. I’ve planned entire weekends around peak autumn foliage, and the results are always worth the effort.
Winter strips the woodland back to its essentials, revealing the stark beauty of bare branches and subtle textures. Frost-covered leaves, icy spider webs, and snow-blanketed scenes offer endless opportunities for minimalist compositions. On a frosty morning, I once captured a tree branch coated in ice crystals, with the soft light of dawn creating a delicate sparkle. Winter woodlands may appear sparse, but their simplicity often leads to strikingly elegant photographs.
Each season challenges you to adapt your approach and look for different elements to photograph. By embracing these changes, you’ll not only improve your skills but also deepen your appreciation for the natural world. Woodland photography is a year-round adventure, with every season offering its own magic.
How to Photograph Woodlands with Confidence
Building confidence in woodland photography comes with practice, experimentation, and a willingness to embrace imperfection. Follow these steps to feel more assured during your forest photography adventures:
- Scout Your Location: Familiarity breeds confidence. Visit the same woodland regularly to understand its unique features, light patterns, and seasonal changes. With repeated visits, you’ll start to notice subtle details you may have missed the first time—such as a striking tree you hadn’t seen or how light hits a particular area at different times of day. This connection with your location builds a sense of comfort and anticipation for future shoots.
- Plan Around Light and Weather: Lighting is everything in woodland photography, and understanding weather conditions can help you make the most of your shoot. Overcast days offer soft, even light that brings out the textures of tree bark and leaves without harsh shadows. Misty or foggy mornings add atmosphere, creating layers of depth and mystery. Rain enhances colours and textures, giving the forest a lush, vibrant feel. Use tools like PhotoPills or Clear Outside to monitor conditions and plan accordingly.
- Simplify Your Gear: Avoid overloading yourself with equipment, especially when trekking through uneven woodland terrain. A camera, a versatile lens such as a 24-105mm on a full-frame camera or 16-70mm on an APS-C (any lens covering focal lengths from 35-85mm full-frame equivalent), and a sturdy tripod are all you need to get started. These basics allow you to focus on your surroundings rather than fussing over excess gear. As you grow more confident, you can introduce additional tools like filters or a macro lens.
- Set Achievable Goals: Don’t pressure yourself to create portfolio-worthy shots during every outing. Instead, set small, focused goals for each trip. For example, aim to experiment with backlighting on one visit, capture a tree’s intricate texture on another, or focus on finding balance within a chaotic scene. Accomplishing these mini-goals builds confidence and skills over time.
- Embrace Mistakes: Not every photograph will turn out as you hope, but each “failure” is an opportunity to learn. Analyse your images after a shoot to identify areas for improvement. Did you miss the focus on your subject? Was the composition cluttered or distracting? Use these insights to adjust your approach next time, turning setbacks into stepping stones. Check out my guide to the most common woodland photography mistakes.
- Experiment with Angles: Confidence comes from trying new things. Shift your perspective by crouching low to capture details on the forest floor, or look up to frame tall trees against the sky. Take shots from different vantage points until you find the most compelling composition.
- Post-Process Thoughtfully: Woodland photography doesn’t end when you click the shutter. Thoughtful post-processing can elevate your images by enhancing the natural tones of greens and browns, increasing contrast to emphasise depth, and eliminating distractions. If you’re unsure where to start, download my most impactful post-processing tips for actionable advice to improve your editing.
- Celebrate Progress: Every small success is a step forward. Reflect on your growth as a photographer by reviewing your older images and comparing them to your more recent work. Celebrate the milestones—whether it’s a sharper image, a better composition, or simply feeling more at ease in the woods. Confidence comes from recognising how far you’ve come and continuing to push your creative boundaries.
Conclusion
Woodland photography is more than just capturing images – it’s an experience, a creative outlet, and a way to connect with the natural world. From selecting the right gear to mastering composition, lighting, and editing, every step offers an opportunity to learn and grow. While the journey may be challenging at times, it’s also incredibly rewarding.
What makes woodland photography so special is its ability to slow you down and make you truly observe your surroundings. It’s about finding beauty in the details—a sunlit tree, the texture of moss, or the soft light filtering through the canopy. These moments, often overlooked in our busy lives, become the foundation for meaningful and memorable images.
As you embark on your woodland photography journey, remember that practice is key. Don’t be discouraged by mistakes – they’re an essential part of learning. Each outing is a chance to improve, whether it’s experimenting with a new technique, revisiting a familiar location in different conditions, or simply taking the time to appreciate the forest around you.
Editing, too, is an integral part of the process. It’s where you can bring out the full potential of your photos, refining them to reflect your creative vision. Subtle adjustments to colour, contrast, and composition can elevate your images and help you convey the magic of the woodland.
So, are you ready to start exploring? Grab your camera, head to your nearest forest, and let the adventure begin. Take your time, experiment, and most importantly, enjoy the process. And if you’re looking for more inspiration and tips, don’t forget to download my free guide, 5 Simple Tips to Transform Your Woodland Photography. Packed with actionable advice, this guide will help you overcome common challenges, refine your techniques, and start capturing stunning forest scenes.
Let’s make your local woods your creative sanctuary. With practice, curiosity, and the right tools, you’ll soon be turning the chaos of the forest into compelling, story-filled images. Are you ready to take the first step?
FAQ: Woodland Photography Basics
u003cstrongu003eWhat is woodland photography, and why is it different from other types of photography?u003c/strongu003e
Woodland photography focuses on capturing the unique beauty of forests and woodlands, which can be both rewarding and challenging. Unlike open landscapes, woodlands are full of intricate details, dynamic light, and overlapping elements that require careful composition. It’s all about embracing the chaos and finding harmony within it.
u003cstrongu003eWhat are the best conditions for woodland photography?u003c/strongu003e
Woodlands often look their best in diffused light, such as on overcast days, during twilight, or in foggy conditions. Rainy weather can also bring out rich colours and textures. Backlit leaves in sunny conditions can create magical effects, but avoid harsh midday light as it can create distracting shadows. For more information, check out my post about u003ca href=u0022https://www.timsmalley.co.uk/blog/best-weather-for-woodland-photography/u0022 data-type=u0022postu0022 data-id=u002227004411u0022u003ethe best weather for woodland photographyu003c/au003e.
u003cstrongu003eWhat are some beginner woodland photography tips?u003c/strongu003e
Start by using a tripod to slow down and compose carefully. Look for strong subjects like trees with character or interesting interactions between elements. Practice observing how light falls on your subject and try different focal lengths – between 35-85mm works well for most woodland scenes. Remember, woodland photography is more about curiosity and observation than following strict rules.
u003cstrongu003eHow can I improve my woodland photography compositions?u003c/strongu003e
Pay attention to how your eye moves through the frame. Think about visual weight and energy flow rather than rigid rules like the rule of thirds. Create separation between elements, avoid distractions and look for natural frames or leading lines. If you’re stuck, try flipping the image upside down to spot areas of imbalance.
u003cstrongu003eWhat are the mental health benefits of woodland photography?u003c/strongu003e
Spending time in nature has proven mental health benefits, such as reducing stress, improving focus, and boosting creativity. Woodland photography takes this a step further by encouraging mindfulness, helping you connect deeply with your surroundings, and offering a creative outlet for expressing your perspective.
u003cstrongu003eWhat mindset should I have for successful woodland photographyu003c/strongu003e?
Approach each session with curiosity and openness. Focus on enjoying the experience of being in nature rather than chasing the perfect shot. Woodland photography is about slowing down, observing, and appreciating the details – whether it’s the texture of bark, the interplay of light, or the scale of the trees around you.
u003cstrongu003eWhat gear do I need for woodland photography?u003c/strongu003e
A sturdy tripod is invaluable for woodland photography to help with precise compositions and low-light conditions. A mid-range zoom lens (covering 35-85mm) is versatile for most scenes. My favourite lens is a 24-105mm, but a travel zoom is a great option too. I have a u003ca href=u0022https://amzn.to/4h1nv6Xu0022u003eTamron 28-200 f/2.8-5.6 Di III RXDu003c/au003e for my main full-frame Sony camera, as well as the u003ca href=u0022https://amzn.to/4iFKg1Du0022u003eSony FE 24-105mm f/4 Gu003c/au003e, and a Sony E 18-135mm for my Sony APS-C body. They cover roughly the same focal lengths (when normalised). You might also consider a macro lens for close-ups of details. Wear waterproof clothing and sturdy boots, as woodlands can be damp and uneven.
u003cstrongu003eCan I capture great woodland photos close to home?u003c/strongu003e
Absolutely! Some of the best woodland photography comes from exploring your local area. Familiar woods allow you to revisit scenes in different conditions, building a deeper connection and honing your skills. Even the most unassuming woodlands can surprise you with opportunities if you approach them with an open mind.